Google analytics for Windows Phone applications

Using an analytics solution to collect some information on your application usage is a real added value to make it a great application. Of course there are informations available on the market place but these informations are quite limited. You only have access to the number of daily download and the installation base but you don’t have information on which part of your app is most used or the time spent on each page of your application. So here I’m giving the steps required to monitor your application usage with online an analytics services like Google Analytics.

Prerequisities

Microsoft was kind enough to create a library to make this task easy. So the first step is to download and install this library. You can get the latest version of the Microsoft Silverlight Analytics Framework here : http://msaf.codeplex.com/
You also need an analytics service provider. Here I am using Google analytics, it’s free and quite powerfull for a free product. If you want to use Google Analytics, you will need to create an account and add a website : http://www.google.com/analytics/

Code
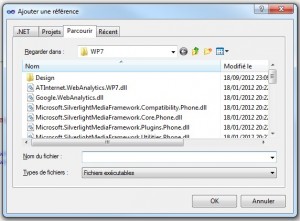
Add references to the following assemblies by manually browsing to C:\Program Files\Microsoft SDKs\Microsoft Silverlight Analytics Framework.4\WP7:

  • Microsoft.SilverlightMediaFramework.Helpers.Phone (Microsoft.SilverlightMediaFramework.Compatibility.Phone.dll)
  • Microsoft.WebAnalytics (Microsoft.WebAnalytics.dll)
  • Microsoft.WebAnalytics.Behaviors (Microsoft.WebAnalytics.Behaviors.dll)
  • Google.WebAnalytics (Google.WebAnalytics.dll)

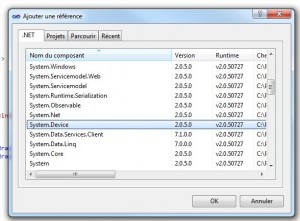
Add reference to the following assemblies using the .Net tab in the “Add reference” dialog box:

  • System.Device
  • System.Windows.Interactivity

The documentation tells you to but DO NOT ADD a reference to ComponentModel (System.ComponentModel.Composition.dll) !!! Otherwise you will get an error about the type AssemblyCatalog beeing defined in two different assemblies.

Create service class derived from IApplicationService

using System;
using System.Net;
using System.Windows;
using System.Windows.Controls;
using System.Windows.Documents;
using System.Windows.Ink;
using System.Windows.Input;
using System.Windows.Media;
using System.Windows.Media.Animation;
using System.Windows.Shapes;
using System.ComponentModel.Composition.Hosting;

namespace AnalyticsSample
{
    public class AnalyticsAppService : IApplicationService
    {
        /// <summary>
        /// Initialize the assembly catalogs for the Silverlight Analytics Framework
        /// </summary>
        /// <param name="context">the application service context</param>
        public void StartService(ApplicationServiceContext context)
        {

            CompositionHost.Initialize(new AssemblyCatalog(
                Application.Current.GetType().Assembly),
                new AssemblyCatalog(typeof(Microsoft.WebAnalytics.AnalyticsEvent).Assembly),
                new AssemblyCatalog(typeof(Microsoft.WebAnalytics.Behaviors.TrackAction).Assembly),
                new AssemblyCatalog(typeof(Google.WebAnalytics.GoogleAnalytics).Assembly));
        }

        /// <summary>
        /// Stop the service
        /// </summary>
        public void StopService()
        {
        }
    }
}

Then you will need to modify your App.xaml file:

<Application
   x:Class="AnalyticsSample.App"
   xmlns="http://schemas.microsoft.com/winfx/2006/xaml/presentation"
   xmlns:x="http://schemas.microsoft.com/winfx/2006/xaml"
   xmlns:phone="clr-namespace:Microsoft.Phone.Controls;assembly=Microsoft.Phone"
   xmlns:shell="clr-namespace:Microsoft.Phone.Shell;assembly=Microsoft.Phone"
   xmlns:local="clr-namespace:AnalyticsSample"
   xmlns:mwa="clr-namespace:Microsoft.WebAnalytics;assembly=Microsoft.WebAnalytics"
   xmlns:ga="clr-namespace:Google.WebAnalytics;assembly=Google.WebAnalytics">

    <!--Ressources d'applications-->
    <Application.Resources>
    </Application.Resources>

    <Application.ApplicationLifetimeObjects>
        <!-- Must be first service -->
        <shell:PhoneApplicationService
           Launching="Application_Launching" Closing="Application_Closing"
           Activated="Application_Activated" Deactivated="Application_Deactivated"/>
       
        <!-- Then the Analytics service we created -->
        <local:AnalyticsAppService/>
       
        <!-- And the Web analytics service provider -->
        <mwa:WebAnalyticsService>
            <mwa:WebAnalyticsService.Services>
                <ga:GoogleAnalytics WebPropertyId="UA-12345-1"/>
            </mwa:WebAnalyticsService.Services>
        </mwa:WebAnalyticsService>
    </Application.ApplicationLifetimeObjects>

</Application>

Here are the modification:

  • Add the namespace for “local” (AnalyticsSample: our application namespace), “mwa” (Microsoft.WebAnalytics) and “ga” (Google.WebAnalytics).
  • Add the AnalyticsAppService you defined earlier to the Application.ApplicationLifetimeObjects node. The line must be typed after shell:PhoneApplicationService, the order is important !
  • Add a web analytics service after local:AnalyticsAppService (again the order is important), replace the “UA-12345-1” with the site id from your Google analytics account.
  • Done ! It takes some time to see the result in Google Analytics.

    Tracking Pivot & Panorama control usage

    The previous steps will correctly report information about your application usage per page, however if your application main interface is based on a Pivot or Panorama control you will not have detailled information about it’s usage. Fortunately, the Microsoft Analytics framework allows you to track your Pivot control usage. Here is how:
    Add a reference to the Microsoft.WebAnaltyics.Controls.WP7 by manually browsing to “C:\Program Files\Microsoft SDKs\Microsoft Silverlight Analytics Framework” with the “Add reference” dialog box.

    Edit your application page and make the following modification:
    * Add the namespace for “i” (System.Windows.Interactivity) and “mwab” (Microsoft.WebAnalytics.Behaviors)
    * Bind the SelectionChanged event to the TrackAction behavior from the analytics framework.

        <i:Interaction.Triggers>
            <i:EventTrigger EventName="SelectionChanged">
                <mwab:TrackAction/>
            </i:EventTrigger>
        </i:Interaction.Triggers>

    You can also make these modifications using Microsoft Expression Blend.

    Edit your AnalyticsAppService and add an AssemblyCatalog line to the StartService method previously defined:

    CompositionHost.Initialize(new AssemblyCatalog(
        Application.Current.GetType().Assembly),
        new AssemblyCatalog(typeof(Microsoft.WebAnalytics.AnalyticsEvent).Assembly),
        new AssemblyCatalog(typeof(Microsoft.WebAnalytics.Behaviors.TrackAction).Assembly),
        new AssemblyCatalog(typeof(Microsoft.WebAnalytics.Controls.HandlePanorama).Assembly),
        new AssemblyCatalog(typeof(Google.WebAnalytics.GoogleAnalytics).Assembly));

    The PanoramaItem/PivotItem Name or Header (if there is no Name) is then tracked in the event’s ActionValue.

    Download example

    A demo application is like a photo, it’s worth a million words so here it is:  AnalyticsSample
Binding to a class property in XAML

Binding something in your XAML file to a property in your underlying partial class is pretty easy once you know the trick. You only have to name your XAML base object. For example, here is a PhoneApplicationPage declaration:

<phone:PhoneApplicationPage
    x:Class="MyApp.MySamplePage"
    x:Name="Self"
    >
    ...
</phone:PhoneApplicationPage>

I always give “Self” as my object name as I find using “Self” in the binding declaration makes the binding obvious but you can use the name you want. My example is for a Windows Phone application however the same mechanism works for any XAML desktop application.

Then you define a property in your class, for example

namespace MyApp
{
    public partial class MySamplePage : PhoneApplicationPage
    {
        public String MyStringProperty { get { return "Binded string"; } }
        ...
    }
}

Now, you can use some binding magic in your XAML file to map a node property to a class property :

<TextBlock Text="{Binding MyStringProperty, ElementName=Self}" />

And Voilà !

Using Silverlight charting control in Windows Phone

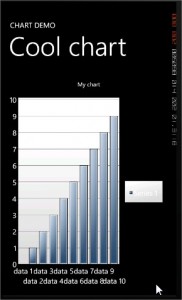
I’m currently working on a small app for Windows Phone. I wanted to add some simples charts to the application and found silverlight contained a charting control. As a reminder for me and as an helpfull example for you, here are the necessary steps to display a simple chart in your Windows Phone Application. The example below was tested against the Windows Phone SDK version 7.1.

Prerequisities

First, you need to install the silverlight libraries from http://silverlight.codeplex.com/

  • Silverlight Phone toolkit
  • Silverlight 3 (not 4 ! not 5 !): It’s an old version but unfortunately, newer silverlight versions are not supported. In fact, Windows Phone SDK is build around Silverlight 3 with some addition from silverlight 4.

Next, you need to add manually the references to the silverlight toolkit by browsing to the Silverlight install folder:

  • System.Windows.Controls.DataVisualization.Toolkit.dll (should be in C:\Program Files\Microsoft SDKs\Silverlight\v3.0\Toolkit\Nov09\Bin)
  • System.Windows.Controls.dll (should be in C:\Program Files\Microsoft SDKs\Silverlight\v3.0\Libraries\Client\)

Code

We need to add the namespace for the charting toolkit, here named “chartingToolkit”:

<phone:PhoneApplicationPage
    x:Class="ChartDemo.MainPage"
    xmlns="http://schemas.microsoft.com/winfx/2006/xaml/presentation"
    xmlns:x="http://schemas.microsoft.com/winfx/2006/xaml"
    xmlns:phone="clr-namespace:Microsoft.Phone.Controls;assembly=Microsoft.Phone"
    xmlns:shell="clr-namespace:Microsoft.Phone.Shell;assembly=Microsoft.Phone"
    xmlns:d="http://schemas.microsoft.com/expression/blend/2008"
    xmlns:mc="http://schemas.openxmlformats.org/markup-compatibility/2006"
    xmlns:chartingToolkit="clr-namespace:System.Windows.Controls.DataVisualization.Charting;assembly=System.Windows.Controls.DataVisualization.Toolkit"
    mc:Ignorable="d" d:DesignWidth="480" d:DesignHeight="768"
    FontFamily="{StaticResource PhoneFontFamilyNormal}"
    FontSize="{StaticResource PhoneFontSizeNormal}"
    Foreground="{StaticResource PhoneForegroundBrush}"
    SupportedOrientations="Portrait" Orientation="Portrait"
    shell:SystemTray.IsVisible="True">
...
</phone:PhoneApplicationPage>

Then we add the control to our application page :

            <chartingToolkit:Chart x:Name="ChartControl" Title="My chart">
                <chartingToolkit:Chart.Axes>
                    <chartingToolkit:LinearAxis Orientation="Y" ShowGridLines="True" />
                </chartingToolkit:Chart.Axes>
                <chartingToolkit:ColumnSeries IndependentValueBinding="{Binding Name}" DependentValueBinding="{Binding Value}" />
            </chartingToolkit:Chart>

Note the binding parameters, they are linked to the data object we defined to hold chart data :

    public class ChartData
    {
        public string Name { get; set; }
        public double Value { get; set; }
    }

We also need some data so we generate some :

            List<ChartData> data = new List<ChartData>();
            for (int i = 0; i < 10; i++)
            {
                data.Add(new ChartData(){
                    Name = String.Format("data {0}", i + 1),
                    Value = i
                });
            }

The final step is to set the data source of the data serie:

            ColumnSeries series = ChartControl.Series[0] as ColumnSeries;
            if (series != null)
                series.ItemsSource = data;

Troubleshooting

If you link your project with the wrong silverlight version you might get the following errors :

  • “A first chance exception of type ‘System.InvalidOperationException‘ occurred in Microsoft.Phone.dl”: You probably forgot to add the reference to System.windows.control
  • “A reference to a higher version or incompatible assembly cannot be added to the project”: You probably linked against Silverlight version 5 dll

Source code

In case it may help, here is the source code of the demo application: ChartDemo application source

WCF : WS-Security Hell

dotnetLastly, I had to build a client to consume a web service. This task seems a bit trivial at first, but the service required an authentication mechanism based on WS-Security. Nothing really complex, the only requirement was to send a username and a password in plain text.

As usual when I build this kind of application, I used Visual Studio wizard to create the proxy to the web service, and after some tweaking in the app.config file, my application was ready to consume this web service !

Unfortunately, there is a security behavior in WCF that prevent from using plain text message based authentication over unsecure transport : i.e. you cannot send a clear password if you are using HTTP as the transport layer instead of HTTPS. That would have been nice of Microsoft to give us a way to override this mechanism easily, but they didn”t (and they didn”t bother to add an explicit error message in the thrown exception…)

So, if you want to send a plain-text username and password using WCF, the only way I found was to stuff the corresponding soap header when sending the request.

Here is my code, use it at your own risks…

public class SecurityBehavior : MessageHeader, IClientMessageInspector, IEndpointBehavior
{
     private string m_sUserName;
     private string m_sPassword;
     public override string Name        
     {            
        get { return "wsse:Security"; }
     }
 
     public override string Namespace        
     {            
        get { return ""; }
     }          
 
     public string UserName        
     {            
        get { return m_sUserName; }
        set { m_sUserName = value; }        
     }          
 
     public string Password        
     {            
        get { return m_sPassword; }            
        set { m_sPassword = value; }        
     }          
 
     public void AfterReceiveReply(ref System.ServiceModel.Channels.Message reply, object correlationState)        
     {                      
 
     }          
 
     public object BeforeSendRequest(ref System.ServiceModel.Channels.Message request, System.ServiceModel.IClientChannel channel)        
     {              
        request.Headers.Add(this);
        return null;
     }          
 
     public void AddBindingParameters(ServiceEndpoint endpoint, System.ServiceModel.Channels.BindingParameterCollection bindingParameters)        
     {                      
 
     }          
 
     public void ApplyClientBehavior(ServiceEndpoint endpoint, ClientRuntime clientRuntime)        
     {            
        clientRuntime.MessageInspectors.Add((IClientMessageInspector)this);
     }          
 
     public void ApplyDispatchBehavior(ServiceEndpoint endpoint, EndpointDispatcher endpointDispatcher)        
     {          
 
     }          
 
     public void Validate(ServiceEndpoint endpoint)        
     {          
 
     }          
 
     protected override void OnWriteHeaderContents(XmlDictionaryWriter writer, MessageVersion messageVersion)        
     {            
        writer.WriteAttributeString("xmlns", "wsse", null, "http://docs.oasis-open.org/wss/2004/01/oasis-200401-wss-wssecurity-secext-1.0.xsd");
        writer.WriteStartElement("wsse:UsernameToken");
        writer.WriteElementString("wsse:Username", m_sUserName);
        writer.WriteStartElement("wsse:Password");
        writer.WriteAttributeString("Type", "http://docs.oasis-open.org/wss/2004/01/oasis-200401-wss-username-token-profile-1.0#PasswordText");
        writer.WriteValue(m_sPassword);                          
        writer.WriteEndElement(); //wsse:Password            
        writer.WriteEndElement(); //wsse:UsernameToken        
     }              
}